A dedicated unikernel for microservices

Sunday, November 10, 2019

My first patch to Linux kernel

Hello everyone! during September I submitted my first patch to the Linux kernel. This was an amazing experience in which I learnt a lot! the main problem was that information is spread in many documents so there is no a single place where are the steps are covered. I wrote down some of these steps here. Bear in mind that the patch was on a kernel module.

Where to code the patch?
My patch was on "vhost/virtio" subsystem so I cloned net-next and I applied the changes there (see https://www.kernel.org/doc/man-pages/linux-next.html)

How to try the patch?
To try it, I backported the changes to my current Ubuntu installation. First, I get the headers of the current Ubuntu by doing:

sudo apt-get install linux-headers-`uname -r`

Then, I got the source code that corresponds with the headers. To know which repository to clone I checked from here https://wiki.ubuntu.com/Kernel/SourceCode.

git checkout -b vsockttest Ubuntu-2.6.27-7.13

I applied the changes and then I compiled only the modules by doing:

make -C /lib/modules/4.15.0-45-generic/build M=$(pwd) modules

Finally, you have to remove old modules and install new ones.

How to write the commit message and correct patch code style automatically?

I titled the commit as “vhost/virtio:”. At the end, I added "Signed-off-by: Matias Ezequiel Vara Larsen ". I added a hook to check code style during commit (see https://kernelnewbies.org/FirstKernelPatch). I had to configure vim to use the right identation and to limit the number of characters of a line. 

How to generate the patch?
To generate a patch from last commit, do:

git format-patch -v2 --subject-prefix='PATCH net-next' -o ../ HEAD^

The patch has the tag "net-next" that indicates that the patch is ready for "net-next". Net-next gets patches in a 2 week windows which go to the next release. Do not send net-next packets if window is not open! (see https://www.kernel.org/doc/Documentation/networking/netdev-FAQ.txt)
The “-v2” indicates that it is the second version of the patch. If you patch is a POC you can tagged with "RFC PATCH".

How to send it?

You can get a list of maintainers by doing:

./scripts/get_maintainer.pl 0001-x86-build-don-t-add-maccumulate-outgoing-args-w-o-co.patc

Use git-send-email to send the patch:

git send-email --to stefanha@redhat.com -cc davem@davemloft.net -cc kvm@vger.kernel.org -cc virtualization@lists.linux-foundation.org -cc netdev@vger.kernel.org -cc linux-kernel@vger.kernel.org -cc matiasevara@gmail.com -cc sgarzare@redhat.com -cc eric.dumazet@gmail.com ../v2-0001-vsock-virtio-add-support-for-MSG_PEEK.patch

How to answer feedback?

To answer feedback configure mutt and answer from there. Don’t use gmail!
It is possible that gmail wont work with mutt. You have to configure your gmail account to allow you to use an unknown device.

Links:
http://nickdesaulniers.github.io/blog/2017/05/16/submitting-your-first-patch-to-the-linux-kernel-and-responding-to-feedback/
https://kernelnewbies.org/FirstKernelPatch
https://kernelnewbies.org/OutreachyfirstpatchSetup?action=show&redirect=OPWfirstpatchSetup
https://shkspr.mobi/blog/2014/04/submitting-trivial-linux-kernel-patches/

Friday, July 05, 2019

QProfiler: A profiler for guests in QEMU/KVM

In this article, I am going to talk about QProfiler which is a tool to profile a guest running on top of QEMU/KVM. The source code is hosted at https://github.com/torokernel/qprofiler. I started this project because I was interested in profiling Toro running as a guest on QEMU/KVM. Roughly speaking, Profiling is to count how often each function is executed. This gives an idea about where the execution time is spent. I am not an expert on this area but I will sum up my research. There are two mechanisms to profile:
   1) by counting how often each function is invoked.
   2) by sampling a process and counting which function is executed in that time.
The mechanism number 1) is intrusive since the code must be modified. The executable must be compiled with the "-pg" option that makes each function to invoke mcount() thus counting the number of times a function is executed. The main benefit of mechanism number 2) is it can profile a process without any modification. However, the result may be not accurate and limited by the maximum sample frequency. In my case, I decided to use the mechanism number 2) by implementing an script that samples a VM by using the Qemu Monitor Protocol. The script gets the %rip register and the %rbp register thus enabling to get current function and the invoked function. It is also possible to get a full backtrace but it remains a TODO work. The only change in the code is to compile by using the “-g” option to add debugging information to the binary. Then, by using addr2line is possible to get the name of the function from an address. The scripts accepts as parameter the duration of the sampling and the sampling frequency. For example, if the script samples during 10 seconds and the sampling frequency is 1s, we end up with 10 samples.
Using QProfile on StaticWebServer shows that 96% of the time the guest is executing Move(). This means that most the time the application is copying data from one block to other. For example, this happens when a new packet arrives and the content is moved to the user’s buffer. This means the networking is not very well optimized and there are too many copies between the kernel’s buffers and the user’s buffers.
There are still open questions regarding with the use of this mechanism: 
  - How fast the script can sample?
  - How does QMP actually work? And does it affect the guest execution?
  - May be more accurate to count the number of times a function is invoked?

Tuesday, July 02, 2019

Speeding Up the Booting Time of a Toro Appliance

Toro is a unikernel written in Freepascal that compiles within the user application and enables to build appliances that can be executed in any modern hypervisor or cloud provider. There are use cases that require that appliances boot faster, e.g., deploying microservices on demand, rebooting from a crash, etc. In these use cases, appliances must be created and initialized and this procedure must be fast enough to keep the quality of service. In this article, we present the work done to speed up the booting time of a Toro appliance. This article begins by explaining how Toro boots up and how we improved current mechanisms by using a multiboot kernel. Then, we present three approaches namely QEMU, NEMU and Firecraker that aim at optimizing some aspects of the Virtual Machine Monitor (VMM) to speed up the booting time of an appliance. 

What do we call “booting time”?

We call booting time the time until KernelMain() is invoked. During that time, the following steps are involved:
    1. The VMM is initialized, e.g., device model initialization, BIOS. This happens at the host side. 
    2. The bootloader starts to execute, e.g., CPUs are initialized, paging is enabled, kernel is loaded into memory. 
    3. The kernel starts to execute, e.g., KernelMain() is executed.  
In this article, booting time takes into account the time just before point 3. 

How does current bootloader work in Toro?

In Toro, the user application is a normal pascal program in which the programmer decides which units to use. The user application and the kernel compile together thus resulting in a binary ELF64. From this binary, the building process generates an image that can be used to boot up a VM or a baremetal host. The generation of the image is based on Build (see https://github.com/torokernel/torokernel/blob/master/builder/build.pas). This application takes an executable and a bootloader, and combines them into a RAW image. The source code of the bootloader can be found at https://github.com/torokernel/torokernel/blob/master/boot/x86_64.s. This is a simple bootloader that:
    • enables long mode and paging
    • wakes up all the cores
    • loads the kernel into memory
    • jumps to the kernel main.     
The benefit of using a RAW image is that the bootloader is simple. It just reads continuous blocks from the disk and put them into memory. No filesystem is needed. Also, it enables to boot the image in most hypervisors without extra work. In addition, the RAW image can be converted to VMDK format to launch a VM in VirtualBox or HyperV. The main drawback of using a RAW image is its size is too big since it is the copy of the kernel in memory. This increases the time to load the kernel into memory. Typically, an image is 4MB and takes about 1.5s to boot up.

The multiboot approach

One way to improve the size of the binary thus reducing the booting time is to leverage on the multiboot specification to generate a multiboot kernel and then use an existing bootloader to boot it up. To do this, the binary must be compiled by following a specific linkage. The binary needs to have a multiboot header that allows the multiboot bootloader to find the different sections and load them into memory. The user application and the kernel are still compiled together but the result is a multiboot binary. 

VMM like QEMU has the option to boot up by using a multiboot kernel. However, QEMU is based on an old multiboot specification and only supports 32 bits kernels. It is some magic necessary to embed a 64 bits kernel into a 32 bits kernel. This magic is done by the script at https://github.com/torokernel/torokernel/blob/master/builder/BuildMultibootKernel.sh

The following figure illustrates what happens when the parameter “-kernel” is passed to QEMU. The kernel binary has to have an extra section named MultibootHeader. That section is used by QEMU to get information during the booting time. For example, it gets the starting address of the bootloader. QEMU then loads the .text and .data sections into memory and jumps to the starting address of the bootloader. In the figure, MultibootLoader is actually in the .text but we split it for the sake of simplicity. When the bootloader starts to execute, the CPU is already in protect mode and paging is enabled. Since previous steps are already done when the bootloader starts to execute, the code of the bootloader can be simplified thus saving time during booting time. The bootloader just has to enable long mode and wake up the cores.       


By using the multiboot approach, the kernel binary is reduced to 145kb and the booting time results in about 450ms so we have a factor of 33% of improvement. The main drawback of this approach is that we need a VMM that supports the loading of a multiboot kernel. Otherwise, we need a bootloader that supports multiboot specification like grub.

Playing with the Virtual Machine Monitor

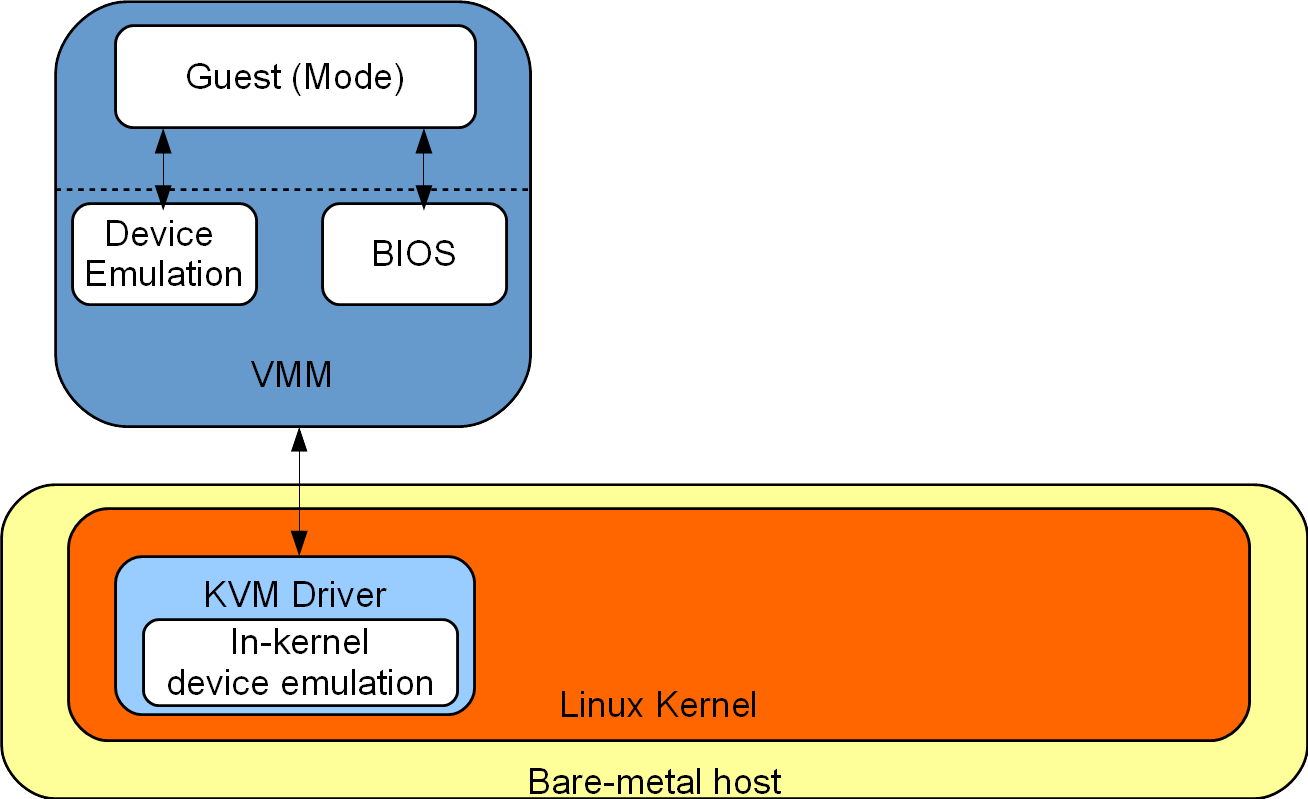
In this section, we present three approaches to improve the booting time by optimizing the VMM. Roughly speaking, these approaches simplify some aspect of the VMM, e.g., the loading of the kernel, the device model and/or the BIOS. The following figure illustrates the possible components that made a VMM. In this figure, the VMM is in charge of the Device Emulation and the BIOS. It communicates to the KVM driver, which can also provide in-kernel device emulation.   


In the following, we roughly present each approach.

QBOOT
It is a minimal x86 firmware for QEMU to boot Linux (see http://github.com/bonzini/qboot). From authors, it is “a couple hardware initialization runtimes written mostly from scratch but with good help from SeaBIOS source code”.

NEMU
It is based on QEMU and only supports x86-64 and aarch64. It proposes a reduced device model by focusing on non-emulated devices to reduce the VMM’s footprint and the attack surface. It proposes a new machine type named “virt” which is thinner and only boots from EUFI.

Firecraker
It is a simple VMM implemented in Rust developed by Amazon Web Services to accelerate the speed and efficiency of services like AWS Lambda and AWS Fargate. The kernel binary must be a ELF64. When kernel starts to execute, the CPU is already in long mode and page tables are set in the Linux way. This simplifies a lot the bootloader.

To evaluate these approaches, we measure the time it takes the kernel to start to execute, i.e., the time since the VM is launched until KernelMain() is invoked. To know more about this work, you can check the issue #276 at GitHub. By using QBOOT in QEMU, Toro takes 135 ms to boot up. In case of NEMU, it takes 95ms. In the case of Firecraker, Toro takes only 17ms to boot up. Note that a simple “echo ‘Hello World’” in the same machine takes about 2.62 ms to execute. 

Conclusions

We presented different approaches to speed up the booting time of a Toro appliance. Booting time is important when we want to launch appliances on demand or if we want to reboot an appliance because it has crashed. In the case of Toro, we show that by using multiboot kernel the size of the binary can be reduced from 4MB to 150kb and the booting time from 1.5s to 0.5ms. From there, improvements can be achieved by optimizing the VMM. Such improvements works on differents components of the VMM like the device model or the BIOS. For example, by using Firecraker, we are able to boot toro in 17ms.

Friday, May 17, 2019

Supports to virtiofs: almost done!

Hello folks! last two weeks I have been working on a virtio-fs driver for Toro. If you want to know more about this virtio device please see https://virtio-fs.gitlab.io. Roughly speaking, virtiofs is a virtio device that allows guest to access files in the host. This virtio device is based on FUSE. The host is the server whereas the guest is the client. The main motivation to add support to this device is to reduce the number of layer between the user and the access to disk. In a typical path, you have at least three layers: the vfs, the block buffer and disk driver. With this new driver we reduce the number of copies for every disk block to one, which is in the user space. Some tests shows me an speed up of 50% in comparison with virtio-blk/fat. If you want to see the code please check https://github.com/torokernel/torokernel/tree/feature/issue%23318. This is going to hit master in some weeks so stay tuned!

Matias 

Tuesday, April 30, 2019

Toro boots on Firecracker

Hello folks! this time I want to talk about Firecraker and the possibility to boot Toro on it. I have presented some of this work at FOSDEM'19. You can find the slides here. Roughly speaking, Firecracker is a simple Virtual Machine Monitor (VMM) for KVM which is develop by Amazon and the goal is to boot light Linux VMs on x86-64 processors. It proposes a simple device model based on virtIO. The interest to allow Toro to boot on Firecraker is twofold:
1. To speed up the booting time. For example, after I worked on the bootloader, it was posible to boot up the kernel in about 20ms.
2. To reduce the footprint of the VMM thus allowing to run more toro's instances.
There is however a lot of remained work. For example, Firecraker is based on the new version of virtIO which is not supported by Toro. It is thus mandatory to work on the current virtIO drivers to support such a version.

Matias

Monday, April 22, 2019

New website and more!

Hello folks! I want to summarize the features/improvements in Toro in the last four months.

New Website 


I worked to change the website as you can see at http://www.torokernel.io. I added a button where you can try the same website on a Toro server. This feature is still beta but I plan to host the whole site on such a webserver. This is the very first time that Toro is in production!

Support to AWS and Google Cloud Engine


I successfully tried Toro examples in AWS and Google Cloud Engine. If you want to try, you can find a tutorial at the website.   

Unit Testing


I added tests that run when a change is integrated into master branch. The tests run as a VM launched by travis.  Tests allow to prevent regressions.

Tachyon


I launched a new project named Tachyon which is a webserver based on the Static WebServer example. You can learn about this project at https://github.com/torokernel/tachyon.


Matias

Tuesday, March 12, 2019

Toro supports VirtIO block disks and Berkeley sockets

Hello folks! I am glad to announce that Toro supports virtio block devices (issue #158) and berkeley sockets (issue #268). I worked on these issues the last two months and they are already in master. To tests these new features, I modified the StaticWebServer example. You can see that the ata driver has been replaced by the virtio disk driver. Also, you can see that the non-blocking webservice has been replaced for the classical berkeley sockets.

Matias 

Thursday, February 07, 2019

Roadmap for 2019

Hello folks! I would like to share the roadmap for this year. I am going to focus on improving Toro to run light microservices on VMs. To achieve this, I am going to work on:
1. Reduce the generated image
2. Speed up the booting time
3. Support to microVM, e.g., Firecracker, NEMU.
Most microVM solutions avoid the using of emulated devices so it is very important to add support for more VirtIO devices. Therefore the next feature is 4) to develop the VirtIO block driver (see issue #158). In addition, Toro is going to support classic berkeley sockets for microservices that performs intense IO. Such a feature is currently developed in issue #268.